‘SPOOK-TACULAR’ Handcrafted Halloween Decor
 ‘SPOOK-TACULAR’
HANDCRAFTED HALLOWEEN DECOR
CREATE
STUDIOS Offers Halloween Decor Ideas That Won’t Break the Bank
(Baton
Rouge, LA) (October 1, 2012) – Each year millions of people face the same daunting question: how
are we going to decorate for Halloween?
This year with the recession many will be looking at original, creative handcrafted
ideas as an alternative to expensive store bought decorations. So with some creativity and a little advanced
planning, Craft & Hobby Association member, Create Studios from Baton Rouge
can help you develop some ‘spook-tacular’ handcrafted Halloween decorations by embellishing
items from discount stores or using items you already have, easily and
affordably.
For a simple yet elegant candles, try
this one.
GLITTERED CANDLES
- Candles.
- White decoupage glue (Mod Podge)
- Fine or ultra-fine glitter
- File folder
- Wax paper
- Cover candle in glue
- Pour glitter in an opened file folder and roll candle in the glitter for tapers. For larger candles put glue on candle and pour on glitter over the file folder.
- Keep sprinkling the glitter until it covers the entire surface. Roll the candle on a piece of wax paper to set the glitter Place candle in a candle holder to dry.
- When finished with all your candles simply fold the file and pour glitter back in bottle.
*Candles
are for decorative purposes only
For
pumpkin lovers, try this twist on the decorative pumpkin.
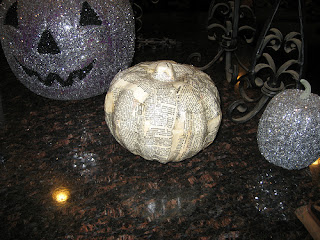
DECOUPAGE PUMPKIN
- Foam or plastic pumpkin (walmart for .97 or dollar store)
- Paintbrush
- White decoupage glue (Mod Podge)
- Pages from an old book
- Wax paper
 |
| Foam Pumpkin |
If using a colored pumpkin you may need to spray paint the pumpkin
white as a base coat or be prepared to put more than one layer of paper on your
item. The color may show through it you do not base coat. I usually just add
two layers of paper.
If using white glue you will need to add water to the glue to thin it
and mix thoroughly, it should be the texture of paint. If using decoupage glue,
you can use straight from the container.
- Tear pages into strips and small pieces.
- Using a paintbrush brush the glue onto your pumpkin and apply the paper in random directions. Use your fingers to smooth out bubble and press the paper into the ridges of the pumpkin. Overlap paper and repeat until pumpkin is completely covered in book pages.
- Use a glass or bowl to place the pumpkin upside down on so that you can get to the bottom of the pumpkin.
- Set aside and let it completely dry.
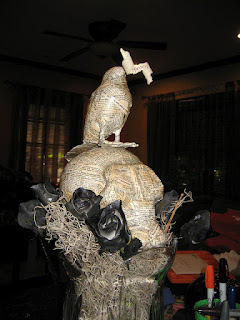
After learning this technique you can decoupage anything in book pages for a great look. The display on the right was created using a feathered crow, plastic skull and spray painted roses from the dollar store. The crow and skull were covered in book pages. The white roses were spray painted black. The crow was glued to the top of the skull. The skull was then placed in a large vase surrounded by moss and the black roses. The entire look was done with less than 5 dollars!
And for a combo of the two, try this…
 |
| Glittered Pumpkins. Back left pumpkin was not varnished and has only lost a little glitter in 3 years! |
Materials:
- If you want to have the eyes, nose and mouth in another color from the pumpkin, do that area first. Put glue in the eyes, nose and mouth area with a fine paintbrush.
- Place the file folder open on your work space to catch the glitter. Then pour glitter over the glued areas. You can reapply glitter until areas is thoroughly coated.
- Dump remaining glitter back into container.
- Let glue dry for about 30 minutes.
- After eyes, nose and mouth have dried you can place glue over the rest of the pumpkin working in small areas. (This is so you can pour a lot of glitter on the area and then refill the bottle with the unused glitter, over and over again. Otherwise you would need to buy 4 times the amount of glitter you need just to be able to cover the surface well with the majority not sticking). Paint glue about a 8th of the pumpkin and pour glitter over it. Refill the glitter bottle and repeat until you have covered the entire pumpkin.
- Let dry completely.
- You can then spray with a varnish to keep the glitter in place. I have never used varnish and pack up my items after halloween and they are still covered in glitter from 3 years ago!
“Halloween is literally what you make of it,”
says Tanya Ruffin, Owner of Create Studios.
“It is the second most marketed
holiday, with retail sales around $2.5 billion dollars per year, but you can save your money! With a little bit of planning and creativity
you can pull together a great LOOK that won’t break the bank.” Just remember, you don’t have to be what you think of as crafty to make items
and save money.
About CREATE STUDIOS
To learn more about crafting for Halloween,
recession-busting projects, and craft classes please contact CREATE STUDIOS at 225-366-9278. CREATE STUDIOS is a creative arts and social
edu~tainment space located at 3613 PERKINS RD. STE.J1, BATON ROUGE, LA. For more information please visit WWW.CREATEBR.COM.
CREATE STUDIOS is a member of the Craft
& Hobby Association.
###


Comments